วันอาทิตย์ที่ 11 สิงหาคม พ.ศ. 2556

Visual Basic 6.0 : Exercise แบบฝึกหัด วิชวลเบสิก 6.0

Visual Basic 6.0 : Exercise แบบฝึกหัด วิชวลเบสิก 6.0

           Teacher  Phaitoon  Yaemprasuan  :   occupatech@gmail.com
                                                                http://picta55.blogspot.com


Exercise 1

Calendar/Time Display

   SOURCE  :   www.kidwares.com

1 Design a window application that displays the current month, day, and year.  Also, display the current time, updating it every second (look into the Timer control).  Make the window look something like a calendar page.  Play with object properties to make it pretty.

ให้นักเรียนออกแบบหน้าต่างแอ็ปปลิเคชัน ที่แสดงเดือนปัจจุบัน วันที่ และปี  และยังแสดงเวลา ณ ปัจจุบัน ที่จะอัปเดตทุกวินาทีอีกด้วย (เหมือนกับนาฬิกาจับเวลา)  หน้าต่างแอ็ปปลิเคชันนี้จะคล้ายเหมือนใบปฏิทิน  และให้นักเรียนตกแต่งอ็อบเจ็กต์ต่างๆ ให้ดูดี


2 Configure the properties of the related objects like the followings.
 ทำการตั้งค่าต่างๆ ให้กับอ็อบเจ็กต์ที่เกี่ยวข้อง เหมือนค่าที่กำหนดมาให้ตามนี้

Configuration 1


Configuration2


Configuration3


3  Attach the source codes to the objects. There is only the Timer "timDisplay" object that we have to attach our source codes to.  Although there is no any variable declared, but we have to type the code "Option Explicit" at the General Declarations module.
 ทำการผูกซอร์สโค้ด (รหัสโปรแกรม) เข้ากับอ็อบเจ็กต์  สำหรับงานนี้จะมีเพียงอ็อบเจ็กต์ไทเมอร์ ที่ชื่อ timDisplay เท่านั้น ที่เราจะต้องใส่โค้ดผูกไว้

Source codes that we have to type.


This is the "Sample Special" output of our project ,
(according to our "date/time" format of our machine configuration)
ตัวอย่าง ผลการรันโปรแกรม
(การแสดงผล ขึ้นอยู่กับการตั้งค่า รูปแบบ "วัน/เวลา" ของเครื่องคอมพ์ที่นักเรียนใช้งานอยู่)

Folder and Printer Sharing การแชร์โฟลเดอร์/เครื่องพิมพ์

Folder and Printer Sharing การแชร์โฟลเดอร์/เครื่องพิมพ์

                      by  Teacher   Phaitoon  Yaemprasuan
                             occupatech@gmail.com; picta55@gmail.com
                             http://picta55.blogspot.com

The Atmosphere of My 2003 Computer Class at 4th Floor of Building1.
They were energetic and very nice schoolkids I have ever experienced.

บรรยากาศห้องเรียนคอมพิวเตอร์  2546 สมัยยังอยู่ชั้น 4  อาคาร 1 
พวกเขาเป็นเด็กนักเรียนที่ขยันขันแข็ง ตั้งใจเรียน และเป็นเด็กดีมากที่สุดรุ่นหนึ่งเท่าที่ครูเคยเจอ
All of us use Windows7 as the operating software, and our computers are connected together within the workgroup of the LAN (local area network). So we should gain the benefit of its sharing capability. Here we go!
ตอนนี้พวกเราล้วนแล้วแต่ใช้ Windows7 เป็นซอฟต์แวร์ระบบปฏิบัติการ (ในห้องเรียน และที่บ้านด้วย)  และเครื่องของพวกเราก็เชื่อมต่อกันเป็นเวิร์กกรุ๊ปในระบบแลน  ดังนั้นเราก็น่าจะใช้ความสามารถในการแชร์ทรัพยากรระหว่างกันได้  ลองดูกัน

1. FOLDER SHARING
        การแชร์โฟลเดอร์

Be sure we have to specify what folder that we want to share?  
ต้องระบุโฟลเดอร์ที่ต้องการแชร์


"BOOKS" is the folder of us to be shared.
ฟลเดอร์ "BOOKS" คือโฟลเดอร์ที่เราอยากแชร์

 Make a right clicking with the folder, the dialogue box appears. Select the "Sharing" tab and the "Advanced Sharing" button
คลิกขวาที่โฟลเดอร์  กรอบโต้ตอบจะปรากฏขึ้น  เราก็เลือกแท็บ 
"Sharing" และปุ่ม 
"Advanced Sharing"


Now the folder has never been shared yet (Not Shared)
ตอนนี้โฟลเดอร์นี้มีสถานภาพไม่ได้ถูกแชร์ไว้

 Properties window of the folder appears and we should select to share it with others. Now we can see the maximum number of users to simultaneously enter to the folder is 20. Then we can click on the "Permission" button.
จะปรากฏหน้าต่างพรอพเพอร์ตีส์ (คุณสมบัติ) ของโฟลเดอร์นี้ขึ้นมา  และเราก็ต้องเลือกว่าจะแชร์กัน  และจะเห็นว่า เพื่อนๆ จะเชื่อมต่อเข้ามาใช้โฟลเดอร์ของเราพร้อมกันได้เต็มที่ 20 เครื่อง แค่นั้น  ต่อมาก็เลือกคลิกปุ่ม "Permission"

Tick the check-box, and we can change the share name or ignore it.
ติ๊กเลือกว่าจะแชร์  จะเปลี่ยน/หรือไม่เปลี่ยนชื่อที่จะแชร์ก็ได้

After clicking on the permission button, the Permissions window shows up, you can add any user e.g. "student" and you can change the permission type of the user.
หลังจากคลิกปุ่ม permission  จะมีหน้าต่างโผล่มาให้เราปรับเปลี่ยนตามความต้องการ

We can add user/ specify his permission level.
เราสามารถเพิ่มยูสเซอร์ / ระบุระดับการอนุญาตใช้งานโฟลเดอร์ของเราแก่เขา

Finally click on the "Apply" button, the folder now has been shared. 
เมื่อเราคลิกปุ่ม "Apply" โฟลเดอร์ของเราก็ได้รับการแบ่งปันให้ใช้ร่วมกันได้ในเครือข่ายแล้ว

Well, our folder has been shared.
Folder ของเราได้รับการแชร์กันใช้เรียบร้อยแล้ว

Sample Special
ตัวอย่าง


This is from my computer (Its hostname is "ALPHA00".), when I click on the "Network" (at the left pane of Windows7 " computer explorer" ),  some computer hostnames appears.  Yes, I want to randomly select any hostname. If the target of mine is "KACHATUCH", well, I would make a double-click on it.
นี่เป็นคอมพิวเตอร์ของครูที่ห้องพักครู (โฮสต์เนมว่า ALPHA00)  เมื่อครูคลิกเลือก Network (อยู่ตรงแถบซ้ายของหน้าต่าง Computer explorer ของ Windows7 ก็จะปรากฏโฮสต์เนมต่างๆ ในเครือข่าย  แน่นอนว่า ครูก็คงต้องสุ่มเลือกเข้าไปใช้เครื่องใดสักเครื่อง  ที่ครูเล็งไว้ก็คือเครื่องที่มีโฮสต์เนมว่า Kachatuch

My Target Hostname is "KACHATUCH"
เครื่องที่ครูเล็งไว้คือ โฮสต์เนมที่ชื่อว่า Kachatuch

The shared folders of the hostname will be appeared. Then we can do a random selection and we can find any other subfolders that we can select to use.
ตอนนี้ก็จะเห็นโฟลเดอร์ที่โฮสต์เนม Kachatuch  เราก็คงต้องสุ่มเลือกโฟลเดอร์  แล้วเราก็จะเห็นโฟลเดอร์ย่อยๆ ที่เราสามารถจะเลือกเข้าไปใช้ได้ 

The Shared Folders of "Kachatuch" appears, any folder could be selected.
  If any shared folder had been selected its subfolders would be revealed. 

แชร์โฟลเดอร์ของโฮสต์เนม "Kachatuch" ก็จะปรากฏขึ้นมาให้เห็น เราสามารถเลือกโฟลเดอร์ไดก็ได้
ถ้าแชร์โฟลเดอร์ใดถูกเลือกเข้าใช้ โฟลเดอร์ย่อยๆ ก็จะได้รับการเปิดตัวออกมาให้เห็นฝเลือกใช้ได้


 2. PRINTER SHARING
        การแชร์พรินเตอร์


 Click the "Start button" of Windows7 desktop, the pop-up menu appears, then select "Devices and Printers", the target printer of us will be appeared.
จากปุ่ม Start ของ Windows7 เราก็เลือก "Devices and Printers"  ก็จะเจอพรินเตอร์ที่เราอยากจะแชร์กันใช้

Select the printer

 Make a right click on the printer icon, the select menu will show up, then select "Printers properties" option.  Then we can operate sharing easily.
คลิกขวาที่รูปพรินเตอร์ จะมีป็อปอัพเมนูโผล่ขึ้นมา ให้เราเลือก "Printers properties" ต่อจากนี้ เราก็คงจะปฏิบัติการแชร์พรินเตอร์ได้ไม่ยากแล้ว...

Select : Printer Properties

Click on the "Sharing tab", and we can rename the sharing printer.
เลือกแท็บ Sharing และสามารถเปลี่ยนชื่อพรินเตอร์ที่กำลังจะแชร์ได้ด้วย

Select the Sharing Tab
    
Select to share

Facebook Data Center ศุนย์ข้อมูลของเฟซบุ๊ก

Facebook Data Center ศุนย์ข้อมูลของเฟซบุ๊ก

                  Teacher Phaitoon  Yaemprasuan  :  http://picta55.blogspot.com
   
                SOURCE  :  http://www.bigpicture.ru


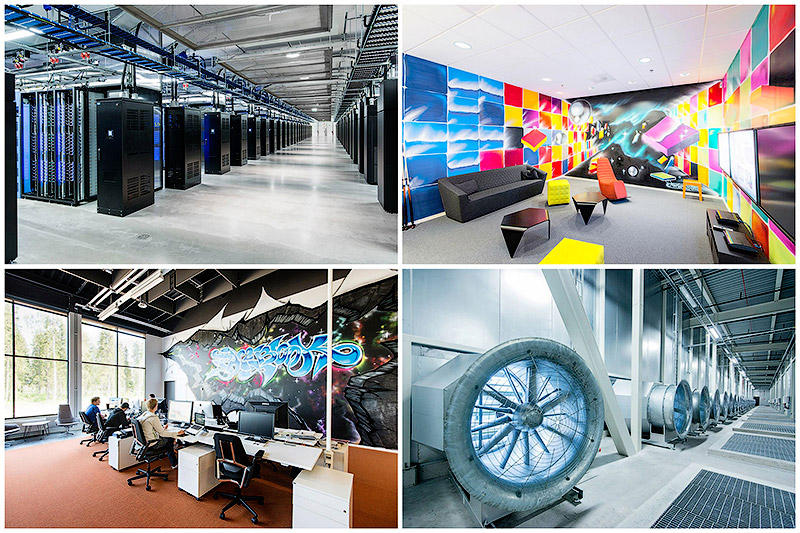
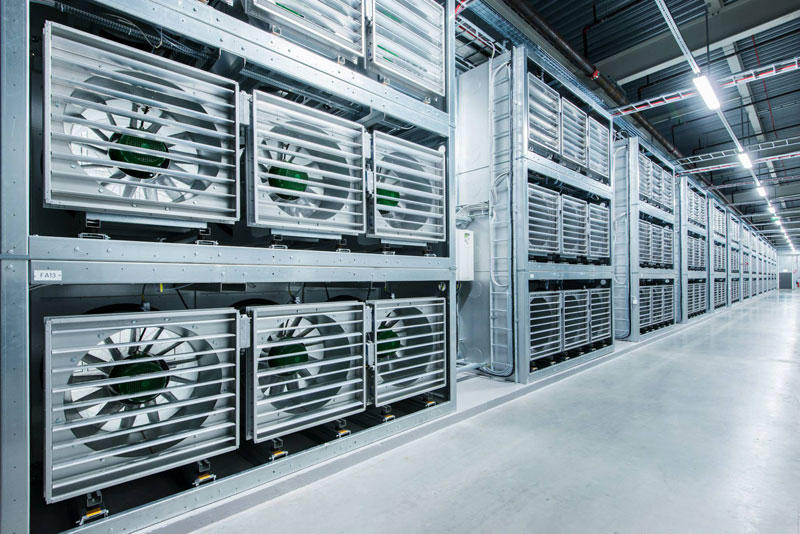
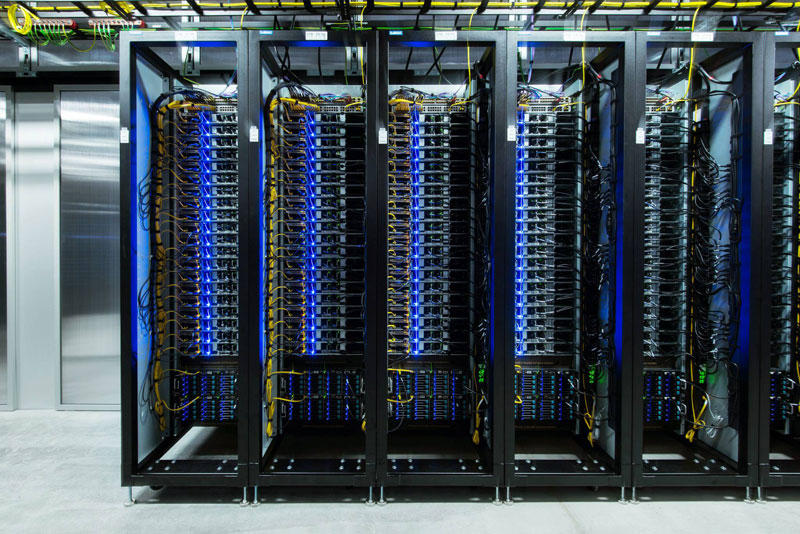
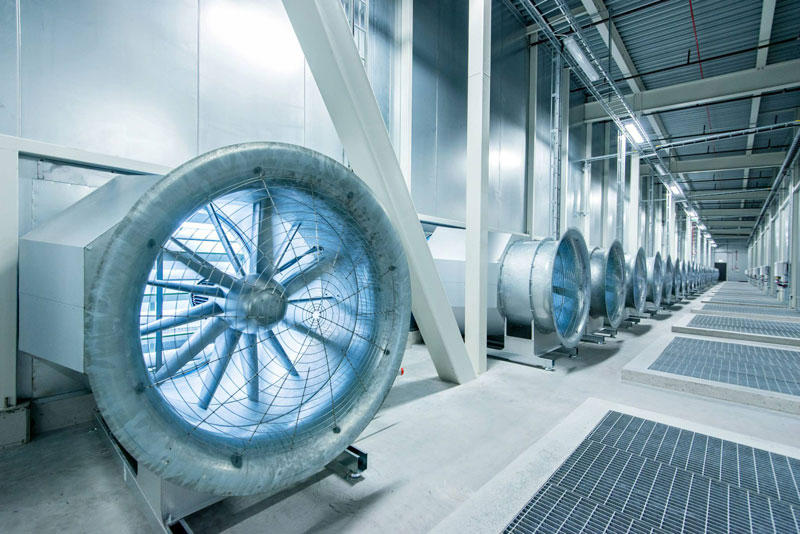
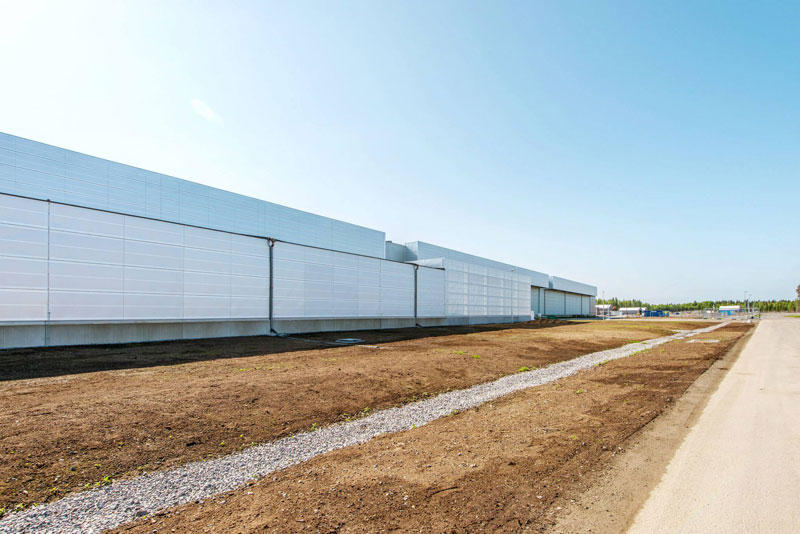
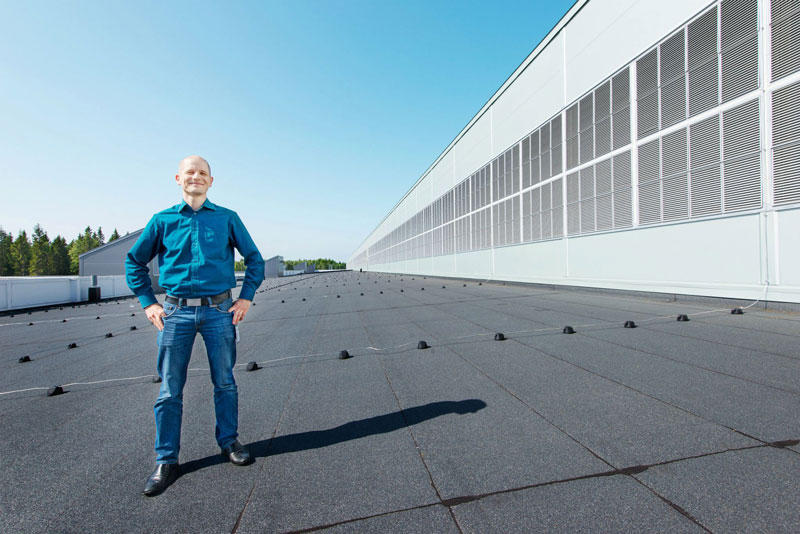
At the edge of the Arctic Circle in Lulea (Sweden) is the newest data center Facebook. The Center handles data about users of social networks around the world. 
 ชายขอบของเส้น Arctic Circle  (เขตอากาศหนาวเหนือ ตั้งแต่เส้นอาร์คติค เซอร์เคิล (Arctic Circle) ถึงขั้วโลกเหนือ เขตนี้ได้รับแสงเฉียงจากดวงอาทิตย์ปีละไม่เกิน 6 เดือน เป็นเขตที่มีประชากรอาศัยอยู่เบาบาง)  เมือง Lulea  ประเทศ Sweden เป็นศูนย์ข้อมูลแห่งใหม่ของ Facebook  ศูนย์ข้อมูลแห่งนี้เก็บข้อมูลของผู้ใช้เครือข่ายสังคอมออนไลน์จากทั่วโลก  (น่าจะรวมเด็กนักเรียนของเราด้วยแน่นอน เพราะเด็กเราชอบและใช้ Facebook กันมหึมามหาศาล จนอาจจะเรียกได้ว่า เป็นกิจวัตรประจำวันไปซะแล้ว)

BIGPIC26 Центр обработки данных Facebook возле Полярного круга 


FBDataCenter01 Центр обработки данных Facebook возле Полярного круга
1. Data center in Lulea became the first data center outside of the U.S..
ศูนย์ข้อมูลแห่งนี้ เป็นศูนย์ข้อมูลแห่งแรกของ Facebook นอกประเทศสหรัฐอเมริกา

FBDataCenter02 Центр обработки данных Facebook возле Полярного круга
2.
FBDataCenter03 Центр обработки данных Facebook возле Полярного круга
3. Facebook Guide believe that Lulea is likely to be one of the most efficient and sustainable data centers in the world.
Facebook เชื่อว่า ศูนย์แห่งนี้จะมีทรงสิทธิภาพ และเก็บข้อมูลได้อย่างยั่งยืนสุดๆ

FBDataCenter04 Центр обработки данных Facebook возле Полярного круга
4.
FBDataCenter05 Центр обработки данных Facebook возле Полярного круга
5. All the equipment in the center provides electricity to the local hydroelectric power plant that runs on renewable energy, thus reducing the number of backup generators for more than 70%.
อุปกรณ์ทั้งหมดในศูนย์แห่งนี้ จะใช้ไฟฟ้าจากพลังงานสะอาด คือจากโรงไฟฟ้าพลังน้ำที่อยู่ในท้องถิ่น ซึ่งเป็น renewable energy (พลังงานหมุนเวียน)  จึงสามารถลดจำนวนเครื่องกำเนิดไฟฟ้าสำรอง (backup generators) ได้ถึงร้อยละ 70

FBDataCenter06 Центр обработки данных Facebook возле Полярного круга
6.
FBDataCenter07 Центр обработки данных Facebook возле Полярного круга
7. In addition to the energy of the water, the center is also used by the northern cold air to cool the servers that store photos, videos, comments and "likes." Any excess heat is used to maintain a comfortable temperature in offices. 
นอกจากพลังงานสะอาดที่ได้จากไฟฟ้าพลังน้ำแล้ว  ศูนย์ข้อมูลแห่งนี้ ก็ยังอาศัยอากาศหนาวที่พัดมาจากขั้วโลกเหนือช่วยระบายความร้อนจากเครื่อง Servers (เครื่องแม่ข่าย) ของศูนย์ฯ ที่เก็บรูปภาพ วิดีโอ และ comments และ likes ของผู้ใช้เฟสบุ๊คจากทั่วโลก  และที่สำคัญความร้อนที่เกิดจากการทำงานของระบบเหล่านี้ จะถูกนำไปสร้างความอบอุ่นในสำนักงานอีกด้วย (เพราะอากาศที่โซนนี้หนาวมากนั่นเอง ตามที่กล่าวแล้ว)
FBDataCenter08 Центр обработки данных Facebook возле Полярного круга
8.
FBDataCenter09 Центр обработки данных Facebook возле Полярного круга
9. Almost all of the technology at the center, from servers to power distribution systems, based on the work of Open Compute Project - community of engineers from around the world, which is engaged in designing storage centers.
เทคโนโลยีของศูนย์ข้อมูลแห่งนี้  ตั้งแต่เครื่องคอมพิวเตอร์แม่ข่าย (servers) ทั้งหลาย ไปจนถึงระบบการกระจายข้อมูล (distribution systems) จะทำงานอยู่บน Open Compute Project ซึ่งเป็นระบบเปิดที่ให้วิศวกรของระบบเฟสบุ๊กจากพื้นที่ต่างๆ ทั่วโลก สามารถเข้ามาใช้งานร่วมกันได้  

FBDataCenter10 Центр обработки данных Facebook возле Полярного круга
10.
FBDataCenter11 Центр обработки данных Facebook возле Полярного круга
11. 


FBDataCenter12 Центр обработки данных Facebook возле Полярного круга
12.
FBDataCenter13 Центр обработки данных Facebook возле Полярного круга
13. 


FBDataCenter14 Центр обработки данных Facebook возле Полярного круга
14.
FBDataCenter15 Центр обработки данных Facebook возле Полярного круга
15. During the first week of work, the coefficient of efficiency of energy consumption in the new center Facebook was 1.07.
ในสัปดาห์แรกของการใช้งาน the coefficient of efficiency of energy (ค่าสัมประสิทธิ์การบริโภคพลังงาน) เท่ากับ 1.07

FBDataCenter16 Центр обработки данных Facebook возле Полярного круга
16.
FBDataCenter17 Центр обработки данных Facebook возле Полярного круга
17.
FBDataCenter18 Центр обработки данных Facebook возле Полярного круга
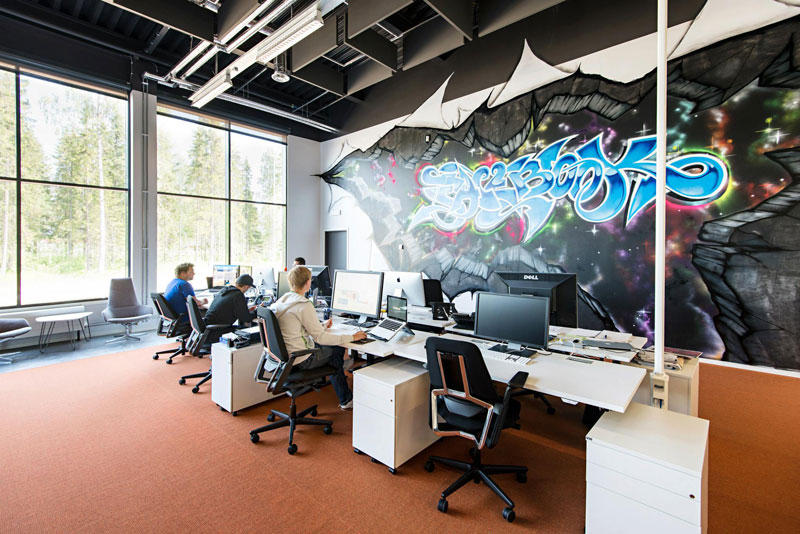
18. The inscription on the wall of the center: "What would you do if you have nothing to be afraid of?"
คำจารึกที่ผนังกำแพงของศูนย์ "คุณจะทำอะไรดีเอ่ย ถ้าไม่มีอะไรที่ทำให้คุณกลัว?"

FBDataCenter19 Центр обработки данных Facebook возле Полярного круга
19.
FBDataCenter20 Центр обработки данных Facebook возле Полярного круга
20. Center Manager - Joel Kelgren.  ผู้จัดการศูนย์

วันจันทร์ที่ 8 กรกฎาคม พ.ศ. 2556

My classmate'blog

My classmate'blog


1.Jinyanawat 
2.Jirapat
4.Donlawat
5.Thanaphong
6.Thanaphan
7.Thanawat
8.Nopparoot
9.Nawaphat
10.Phanathon
11.Phoomrapee
12. Rarm 
13.wootichai
14.Sirawat
15.Siripat
16.Attakorn 
17.Nonthapat
18.Kamonchanok
19.Kornkanya
20.Kanvara 
21. Kwankeaw
22.Chattip 
23.Chanikan
24.Chawisa

25.Chutima 
26.Yanisa
27.Natcha
28.Nattida
29.Natnicha 
30.Nattida
31.Tachkorn
32.Thanyamon
33.Nongnapat
34.Benjarat
35.Patthama
36.pornat
37.Putiya
38.Montinee
39.Manasicha 
40.Supukkan
41.Anakkawee
42.Apichaya
43.Arissara
44.Ajcharawan
45.Intira
46.Phavinee

Chattip Um 


วันอังคารที่ 2 กรกฎาคม พ.ศ. 2556

My Shcool

 My Shcool


It is a celebration of the school is the school beauty rules that require everyone to practice good manners with school work, I love it.
   This year it is M.2 above what new thing this year, according to a study important signal for the future of our own.School taught me a better person and I love water.


วันจันทร์ที่ 1 กรกฎาคม พ.ศ. 2556

How to create blogger

How to create blogger


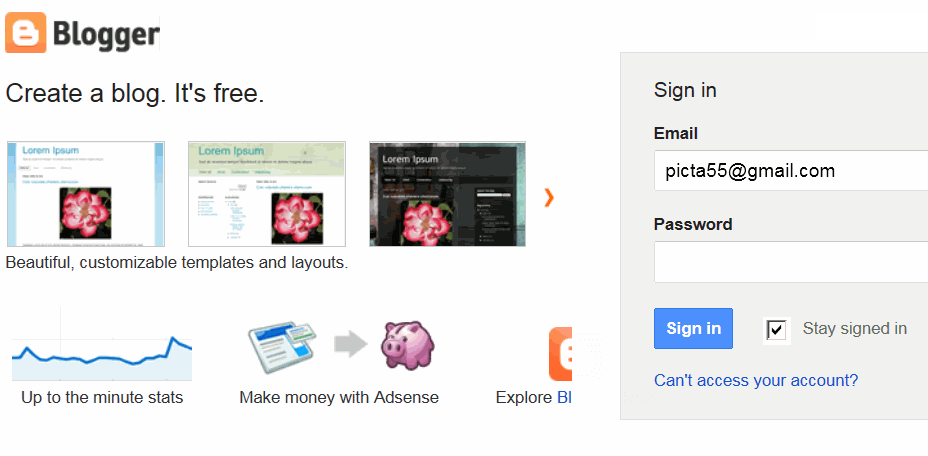
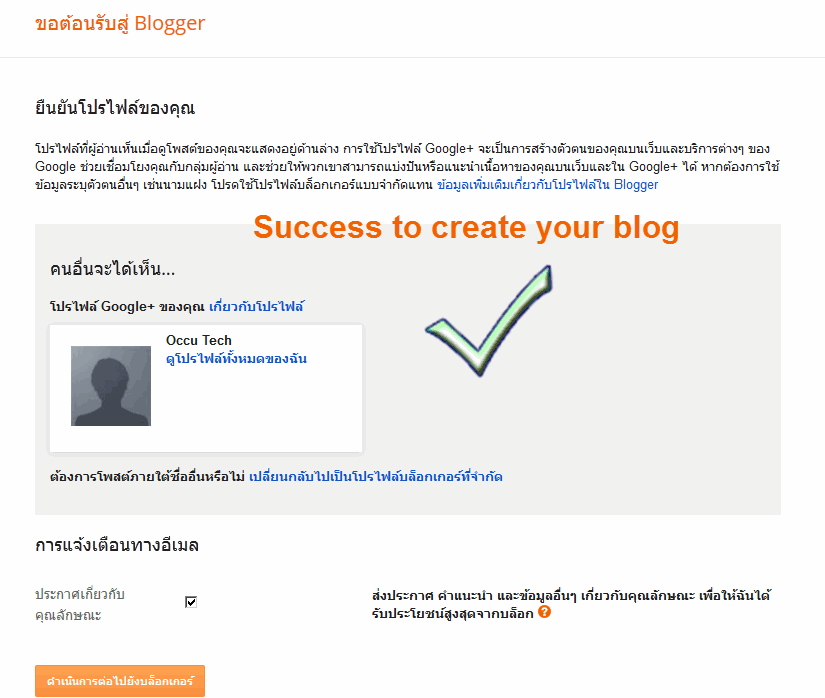
2. After entering your Gmail with its password the "Welcome Screen" of Blogger appears and confirms that you have just passed its regulation. Now you can either add your profile details or skip to the next step.

ถ้ากรอกถูกต้อง นักเรียนก็จะมาพบกับหน้าจอ ตอบรับของ blogger  ตรงนี้นักเรียนอาจจะเพิ่มรายละเอียดเกี่ยวกับตัวเองลงไปใน Profile ก็ได้  หรืออาจจะข้ามไปก็ได้ 


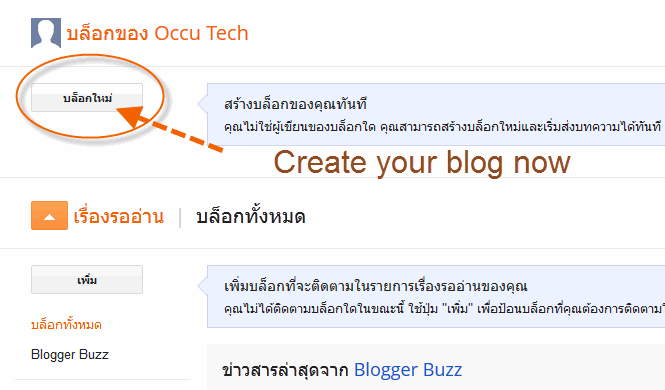
3. See "New Blog" and click, wow, to create your blog any way!!!

หลังจากนั้นก็จะเข้าสู่หน้าจอที่บอกว่า ให้นักเรียนสร้างบล็อกได้  ก็ทำง่ายๆ เพียงแค่คลิกที่ "บล็อกใหม่"  

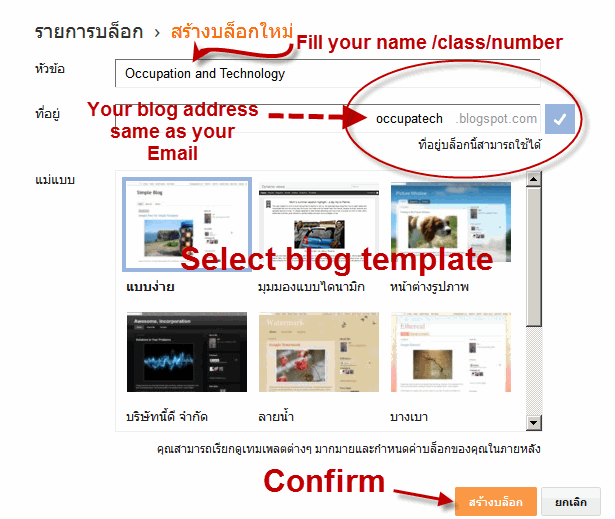
4. Yeah!, you have to fill some fields related to your new blog e.g.  its title, its address and its template. But you can pass this task easily. Or you can skip it .

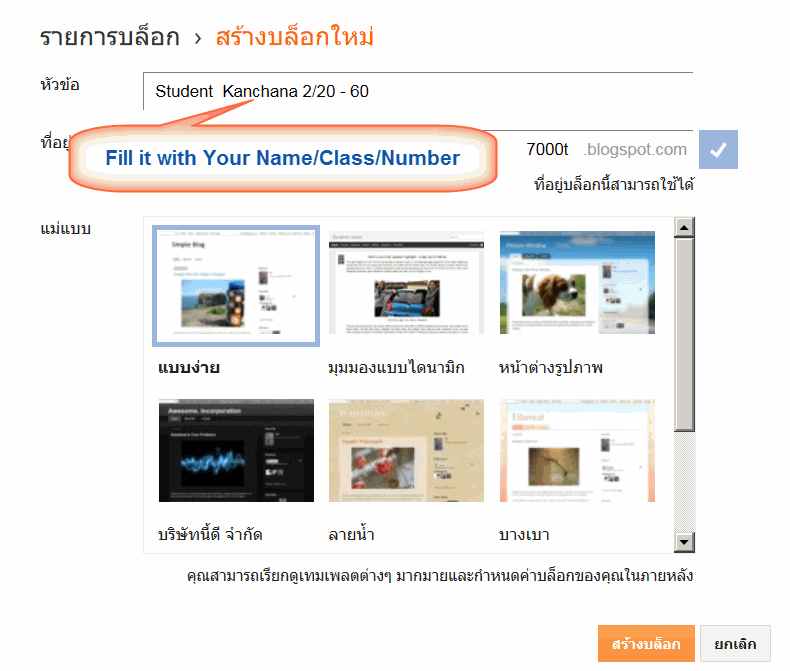
 หลังจากที่คลิกบล็อกใหม่  นักเรียนก็จะมาพบกับหน้าจอที่เขียนว่า รายการบล็อก  นักเรียนก็จะต้องกรอกที่อยู่ของบล็อก  ซึ่งนักเรียนก็กรอกตามที่ครูกำหนด คือเลขประจำตัว 4 หลัก ตามด้วยตัวอักษรของชื่อ  ในภาพเป็นบล็อกของครูที่ทำเป็นตัวอย่าง  (ของนักเรียนต้องดูภาพล่างถัดจากภาพนี้) 
===> เมื่อกรอกถูกแล้วก็ยืนยันว่า สร้างบล็อก

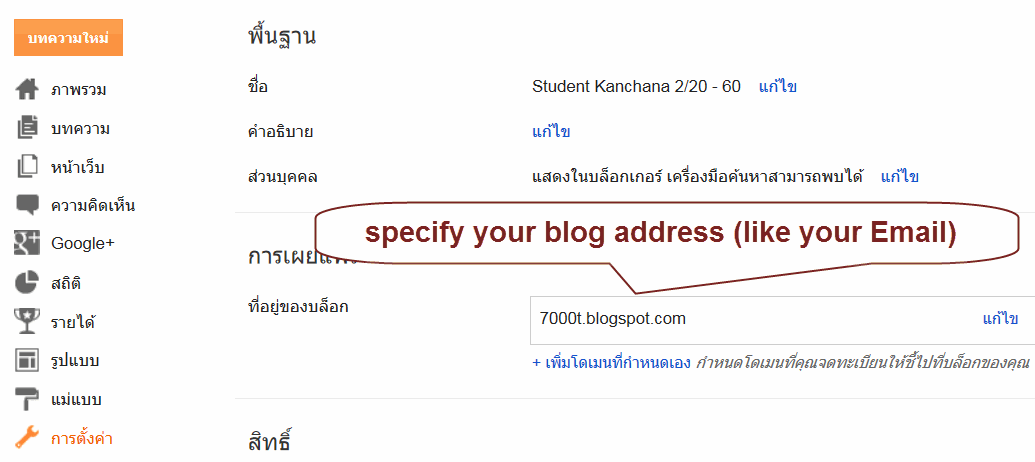
5. You can select "Settings Option" to change the style/template of your blog anyway and anytime.

นักเรียนสามารถเปลี่ยนแปลงสิ่งที่กำหนดไว้ของบล็อกได้  โดยไปเลือกที่การตั้งค่า
หรือเปลี่ยนรูปแบบ/แม่แบบ ก็ยังได้  (ดังรูปข้างล่างนี้)

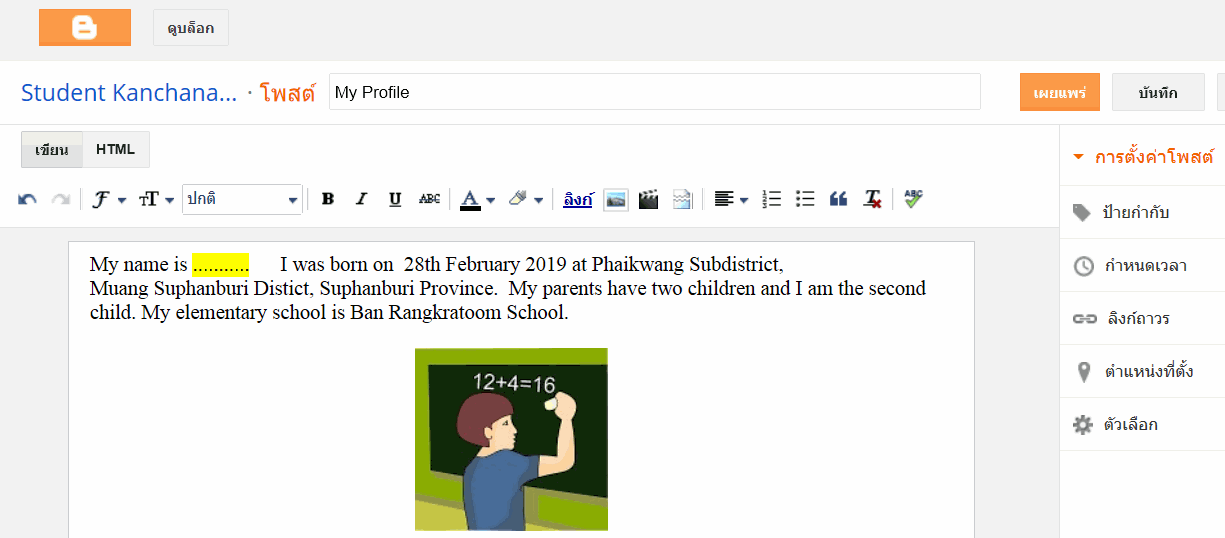
6. Well, you can start your post now.  See the sample below.

ลงมือสร้างบทความ (POST)  ดังตัวอย่าง หลังจากนั้นก็เผยแพร่ (Publish)


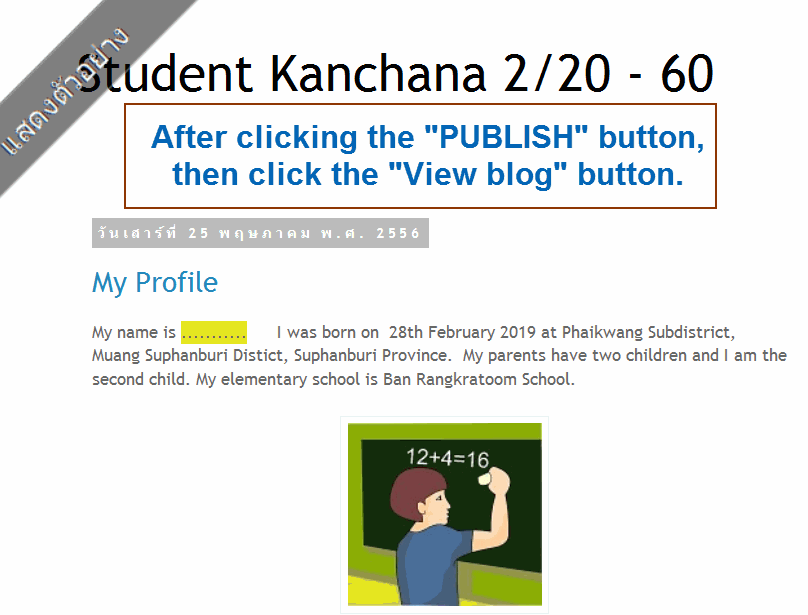
7.  When you select the option "View Blog", your blog with your post will appears like the following.

เมื่อเราเรียกดูบล็อก (View blog)  ก็จะมีหน้าตาทำนองนี้ ดังตัวอย่าง


YOU ARE EXPECTED TO START CREATING YOUR BLOG NOW. Please don't say never again, do you?